Mike's Baking on Channel 4

Check me out on Baking Mad with Eric Lanlard!

Muffin Mondays

Check out all the yummy Muffin Monday recipes.

Take the challenge: Live Below The Line

I am taking the challenge and going to Live Below The Line from May 7th - 11th. Join me!

CAKE!

Check out the yummy cake recipes!

Cupcakes!

Check out all the yummy cupcakes!

Happy Holidays!


Keep entering the giveaways and you might win!! Winners will be picked on the 9th of January 2013.
  1. Cake Mould Giveaway (1 Winner) Update(Feb2013) - The company has stopped responding to me and not sent out prizes as promised. :-/
  2. Book Giveaway (6 Winners)
Thanks for reading my blog!

Book Reviews and More Giveaways!

I was recently sent copies of the books pictured below to have a little review of them but also to give away 3 copies of each book, 6 lucky readers will win one of the books!! If you didn't enter or win the last giveaway, make sure you enter this one using the rafflecopter form at the end of this post. Winners will be selected on the 9th of January 2013! Winners will be contacted by email and must be over 18 with a valid UK or Ireland mailing address. Good luck!


Marshmallow Madness - I was quite excited to receive this book as I love marshmallows but never thought about making them at home. I always thought that the process would be extremely messy and the marshmallows wouldn't come out nice but after reading the introduction with Shauna's insight, knowledge, and tips on how to make marshmallows and make them well. I was ready to get in the kitchen right away, but to make them successfully you really need a stand mixer... I have one of those but someone in this household has made my stand mixer unusable!! So until that gets fixed no marshmallow making for me, which stinks but I'm hoping the unnamed person will be fixing it soon as there are so many recipes that I want to tryout in this book. There are 6 sections in this book starting with the classic marshmallows, fresh and fruity, happy hour, for the mallow connoisseur, kids in a candy store, and then ending with other fluffy puffy desserts. My top picks from each of the chapters to try out would be jam-filled marshmallows, key lime pie marshmallows, buttered rum marshmallows, the elvis marshmallow, pb&j marshmallows, and blonde rocky road. Those would be the first few recipes that I would want to try out to begin with but there are many more unique marshmallow recipes in this book. The photos are beautifully shot however I wish there were more. Shauna has really taken marshmallow making to the next level and I can't wait to start making marshmallows and maybe even come up with my own unique flavour combination idea!

Pure Vanilla - With most recipe books mainly focusing on chocolate, it is refreshing to see a book focus on vanilla! Most books start with a short introduction, but this book's introduction is 20 pages giving a brief history of vanilla, from orchid to extract, origins, varieties and tasting notes, as well as frequently asked questions. I learned quite a few things after reading this section.  Shauna has divided the book into 6 chapters, breakfasts, cakes and pies, cookies and bars, candies and confections, custard and creams, and finally drinks! There are some classic recipes in there but Shauna has turned the creative juices up for this recipe book. Here are my top picks from each chapter, Vanilla Brown Sugar & Black Pepper Bacon, Tres Leches Cake, Salted Vanilla Chip Oatmeal Cookies, Golden Pear Vanilla Jam, Nutty Vanilla Spread, and a Vanilla Mojito. These are just a few that screamed out to me that I would love to try making first from this wonderful. Again the photos throughout the book are beautiful but wish there were more! So forget about the chocolate and check out this book to make many yummy vanilla inspired recipes from Shauna.

Which book would you love to add to your collection?
a Rafflecopter giveaway

Book Review: Tart It Up by Eric Lanlard

I normally feature cupcakes or other sweet treats on here with the occasional savoury recipe. However, I haven't featured many tarts or pies here, sweet or savoury. It's not that I haven't tried making them because I have had this fabulous book, Tart it up! by Eric Lanlard, for awhile but my efforts although tasty have not come out looking as beautiful as they taste. I think I need another masterclass with Eric to work on my presentation skills. I didn't grow up with a lot of pies or tarts, and if we did have the odd occasional one it definitely wasn't homemade. So I don't have a lot of practice in this section of baking but I will continue to work on it and hopefully be able to share a recipe inspired by Eric's book with you soon.  As it is getting closer to Christmas, I wanted to share with you a little book review on this wonderful book.

On to the book!

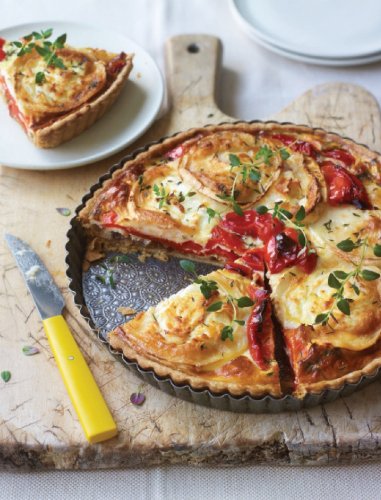
The book starts off with an introduction from Eric and his love of pastry and how he discovered what it takes to be a good pâtissier. Then it moves onto pastry basics and explains several different doughs and tips on how to make them. This is the most important section of the book as the dough recipes are used in every recipe, although the recipes state you can use ready made... but what's the fun in that? :-p However, I am guilty of using the shop bought versions of the dough when I have been short on time! The book then moves onto the savoury tarts and pies. The photography in this book is beautiful and features glimpses of Eric throughout making some of the recipes. Our favourite recipe tried from this section is the lamb and moroccan spice pie. The tart pictured to the right is a roasted red pepper and goat's cheese tart which is also very nice. There are lots of yummy recipes of savoury pies and tarts which are perfect for dinner time. I have many more I want to try out.

The next section of the book moves onto sweet tarts and pies. A majority of this section includes such unique recipes with flavours I would never think of being together but seeing them in the book makes you want to try out these amazing recipes. One that looks really amazing to me is the chocolate and earl grey tarts with roasted figs... yum!! That is definitely on my to make list. The recipes are easy to follow but there is even one recipe that only has two ingredients not including the pastry crust, which is the gypsy tart. The gypsy tart got mixed reviews from friends but I really enjoyed it and next time I make it I will serve it with Eric's lemon cheese recipe as I bet the two combined together would be lovely. There is such a variety of sweet recipes in this book, some very unique ones and also classic ones all with Eric's special touch. I think for my next birthday I will be requesting a recipe from this book and have a birthday pie instead of a birthday cake.

Eric loves baking and it truly shows in this book. I can't wait to continue trying out the yummy recipes in this book. If you don't have this book yet, put it on your Christmas wish list. It would make a great addition to any recipe book collection. Or just go on and buy this fabulous book now!

Candy Cane Sugar Cookies

So I had quite a bit of crushed candy canes leftover from the last recipe, Candy Cane Mocha Cupcakes! I decided that I could use them with sugar cookies. I whipped up a quick batch of sugar cookie dough (use your favorite recipe) and formed them into little dough balls then thoroughly coated them in the crushed candy canes. Pop them onto a nonstick paper lined baking tray, so they don't stick and then bake according to the recipe that you are using. SIMPLES! These smelled great while baking, I couldn't wait to try one.  I have had quite a few now, they are very tasty! Hmm what else can I cover sugar cookies in?? Any ideas? Let me know in the comment section. :)


Book Giveaway!!

To get even more into the holiday spirit, I am giving away The Hummingbird Bakery: Cake Days book to one lucky reader in the UK! After buying this book last year, I started baking quite a lot and then started this blog. Many of the recipes featured on here are based on recipes from this book. Who knows if I would have even started blogging if it wasn't for getting this book?! All of the recipes that I have tried from this book have been wonderful and I will continue to bake my way through this book. If you love baking or know someone who would love this book, enter below on the Rafflecopter form. One winner will be selected on the 14th of December 2012! Winner will be contacted by email and must be over 18 with a valid UK address.

Good luck!! :)
 
   a Rafflecopter giveaway

Candy Cane Mocha Cupcakes

Happy December everyone!! To get into the holiday spirit, I decided to make Candy Cane Mocha cupcakes and use these reindeer cupcakes holders from PartyDelight.co.uk. The holders come with cupcake liners as well and thought it would be perfect for this recipe! The recipe comes from the Hummingbird Bakery book and I added my own little touch to the recipe. I love mochas and with the addition of peppermint candy canes, it made these cupcakes very festive and yummy! I tried crushing the candy canes but made a huge mess, so popped them into a food chopper and pulverised them to little bits. After that, I added quite a few teaspoons to the frosting and saved some to sprinkle on top. I still have lots left over, so I need to think of another recipe to use the candy cane bits. Try this recipe out for yourself and get into the holiday spirit. I'm off to have another one of these yummy cupcakes!

Ingredients:
Cake:
240ml whole milk
15g hot chocolate powder
5g instant espresso powder
80g unsalted butter, softened
280g caster sugar
240g plain flour
1 tbsp baking powder

1/4 tsp salt
2 large eggs

Frosting:
50ml whole milk
30g hot chocolate powder
500g icing sugar
160g unsalted butter, softened
crushed candy canes, to decorate

Steps:
Preheat oven to 190C/375F and line a muffin tin with muffin cases. Gently warm the milk, without letting it boil, then remove from heat and mix in hot chocolate powder and espresso powder, stir until dissolved then set aside to cool. In a medium bowl, whisk together the butter, sugar, flour, baking powder and salt on a low speed until the ingredients resemble fine breadcrumbs. Place the eggs in the bowl with the milk mixture and whisk together by hand. Add 3/4 of the milk mixture to the dry mix and combine together, then increase the speed and add the remaining milk mixture. Continue to mix until smooth. Divide the batter between the cases, fill them to two-thirds full. Bake in the oven for 18-20 minutes. Leave to cool slightly before removing from the tin, then place them on a wire rack to cool completely. FROSTING: Gently heat the milk, add in the hot chocolate powder, dissolve and set aside to cool. Mix the icing sugar and butter until no lumps of butter remain and then gradually add the hot chocolate milk. Once this has all been added increase the speed and mix until light and fluffy. Top each cake with a generous spoonful of frosting and smooth with a palette knife or pipe frosting on and decorate. Decorate with crushed candy canes or add some into the frosting or do both!


If you would like to buy the Reindeer Cupcake holders, you can order them from PartyDelights.co.uk, they are perfect for a holiday party.

Earl Grey Tea Cupcakes

My friend Jennifer came over to do some baking with me. She looked through my baking books a few weeks ago and wanted to try out these Earl Grey cupcakes from the Hummingbird Bakery book. I love Earl Grey tea but wasn't sure what it would be like as a cupcake. As always the Hummingbird Bakery recipes are super easy to make and we only added an extra teabag to the recipe. Not only was it was an easy recipe but it was very yummy. The cake had a subtle Earl Grey flavour, I would use more teabags and possibly infuse them with the milk mixture as well next time. The frosting had a wonderful Earl Grey flavour and really complimented the cake. We even sprinkled some of the dried tea on the cakes, we liked a stronger Earl Grey flavour. Try this recipe out yourself and I am going to try out their suggestion of using pepermint tea instead, which I imagine will be just as yummy as well. Can you think of any other teas which would be nice as a cupcake?

Ingredients:
Cake:
4 Earl Grey teabags
3 tbsp just boiled water
80g unsalted butter, softened
280g caster sugar
240g plain flour
1 tbsp baking powder

1/4 tsp salt
200ml milk
2 large eggs

Frosting:
50ml whole milk
500g icing sugar
160g unsalted butter, softened.

Steps:
Preheat oven to 190C/375F and line a muffin tin with muffin cases. Place the teabags in a small bowl and add the hot water, allow to infuse for 30 minutes. In a medium bowl, whisk together the butter, sugar, flour, baking powder and salt on a low speed until the ingredients resemble fine breadcrumbs. Place the milk and eggs in the bowl with the tea and whisk together by hand. Add 3/4 of the tea mixture to the dry mix and combine together, then increase the speed and add the remaining milk mixture. Continue to mix until smooth. Divide the batter between the cases, fill them to two-thirds full. Bake in the oven for 18-20 minutes. Leave to cool slightly before removing from the tin, then place them on a wire rack to cool completely. FROSTING: Place the used tea bags in a small bowl with the milk. Mix the icing sugar and butter until no lumps of butter remain and then gradually add the tea infused milk. Once this has all been added increase the speed and mix until light and fluffy. Top each cake with a generous spoonful of frosting and smooth with a palette knife or pipe frosting on and decorate.


I love Chipotle Chiles!!

I love chipotle chile peppers so much!! I discovered them a few years back and love adding them to recipes, I just love the smoky subtle heat that these chiles add to a dish. I use all versions of the chiles from its natural dry state to powder to sauce! It can sometimes be hard to find chipotle chile in shops in the UK, but you can easily find them on the internet. I just found one seller saying they can even be used in dessert recipes, I have yet to try that but really want to find a good recipe to try out... Chipotle Chile Chocolate cupcakes maybe?? Ok back to the reason why I am mentioning these chiles in a post. Have you ever heard of Chef John and Food Wishes? Well he is a very popular blogger and creates really great video recipes. I have been watching for a while now but just got around to actually making one of his recipes. We were having a Halloween get together this past weekend and I wanted to make chili again for it but wanted to try a new recipe out. I was watching Chef John's YouTube channel and found Sweet Potato and Black Bean Chili, and it had CHIPOTLE CHILE POWDER in the recipe, so I decided to make it for the party. I pretty much followed the recipe and only changed a few things. In place of water I used pale ale and just over 2 cups of it, which is equal to a pint. I also wasn't watching the video when I made them so had to remember what to do from memory. Well I forgot to add the chipotle powder to the sweet potatoes when roasting them, so I decided to add them in when I was frying the onions up and I used about a tablespoon of it and less of the other chile powder added in later. Everything else I did pretty much followed the recipe. I had it simmering for quite awhile allowing all the flavors to come together and for the chili to thicken up! It was so GOOD! Everyone enjoyed it and it is a great vegetarian option to chili con carne! Try this recipe out... I need to make more of Chef John's recipes!

Check out Chef John's video recipe for Sweet Potato and Black Bean Chili.

Pumpkin Pie Cookies

I found some more free time, so I decided to do more baking and another blog post! As we are getting closer to Halloween, I wanted to make a recipe that had pumpkin in it. I should have made a more Halloween inspired recipe but maybe I can squeeze another baking session in before then, but for now we have a Pumpkin Pie cookie!! As soon as I saw this recipe, I knew that I had to try it out and I didn't really make that many changes except for using pumpkin pie spice instead of just cinnamon and nutmeg. If you can't get pumpkin pie spice, it is very easy to make your own, I make my own from the last 4 ingredients on this recipe, you can change the quantities of the spices but keep the proportions the same and you have what they sell in some shops as pumpkin pie spice. These cookies turned out very moist and cake like, very yummy!

Recipe inspired by Very Best Baking
Ingredients:
2 1/2 cups plain flour
1 tsp baking powder
1 tsp baking soda
2 tsp pumpkin pie spice
1/2 tsp salt
1 1/2 cups caster sugar
1/2 cup butter
1 cup pumpkin puree

1 large egg
1 tsp vanilla extract

Glaze:
1 cup icing sugar
2 tbsp milk
1 tsp pumpkin pie spice

Steps:
Preheat oven to 175C/350F. Grease baking sheets. Combine flour, baking powder, baking soda, pumpkin pie spice and salt in medium bowl. Beat sugar and butter in large mixer bowl until well blended. Beat in pumpkin, egg and vanilla extract until smooth. Gradually beat in flour mixture. Drop by rounded tablespoon onto prepared baking sheets. Bake for 15 to 18 minutes or until edges are firm. Cool on baking sheets for 2 minutes; remove to wire racks to cool completely. Mix together all ingredients for the glaze and drizzle over the cooled cookies.


Happy Halloween!

Mediterranean Croissants

Finally a new recipe on here!! Sorry, that it is been so long since I have shared any recipes on here, life has been very busy the last few months but I am getting used to my new schedule and found time to write a blog post. About 2 years ago, we went on a trip to Greece and we frequently visited this little cafe in Athens for lunch. They had all types of baguette sandwiches and I particularly liked what I think they called a Greek baguette. It had kalamata olive tapenade, tomatoes, feta, and spinach leaves on it, simple but all the flavours that I love. Since that trip, I have recreated the sandwich at home but never thought about using similar flavours for baking a yummy treat. That is exactly what I have made today with some slight tweaks... I've added garlic in, replaced the tomatoes with sun dried tomatoes, basil in place of spinach, and a croissant instead of a baguette! Popped them in the oven and the smells coming out were so yummy, I couldn't wait to try them. These treats would be great starters for a little get together. I loved them!

Recipe inspired by my trip to Greece!
Ingredients:
Your favourite croissant dough
recipe or use shop-bought puff
pastry, enough to make 8 small
to medium size croissants

For the filling:
Jar of kalamata olive tapenade
100g Feta cheese
4 cloves of Garlic, crushed
8 large sun-dried tomatoes, sliced
Handful of fresh Basil leaves
Steps:
Preheat oven to the temperature according to your croissant dough or puff pastry recipe. Crumble the feta in a bowl with the crushed garlic and mix together, then set aside. Now, cut your dough into triangles then take a heaped teaspoon of the olive tapenade and spread across the top of the dough. On top of the olive tapenade, evenly place 1 sliced sun-dried tomato along the base of the dough triangle. Follow this with a spoonful of the feta mixture and then cover with 2 to 3 basil leaves. Slowly start to roll up the base of the triangle to the tip and place on your baking tray. Bake according to the dough recipe that you are using, let them cool for 5 minutes on the tray before serving.


Assembling the Mediterranean Croissants: 

Baked and ready to eat!
 

Guest Post: Tip-top picks for baking accessory specialities

Hey readers!!

Sorry, that I have not posted any recipes lately... I have been so busy the past few months with work, changing to a part time job, and then starting full time university. I am hoping now that everything is set up and I am starting to get a routine, that I can return to baking for the blog. In the mean time, please enjoy the guest post below from blogger Tamsin McCahill and I will be back with yummy recipes shortly! :)

Take care,
Mike


Tip-Top Picks For Baking Accessory Specialities

Do you love baking? You’re not alone. With programmes such as the Great British Bake Off becoming a ratings hit and Jubilee-inspired tea parties popping up all over the place, home baking has never been so popular. I too love nothing more than donning a pinny to unleash my inner domestic goddess. I've come to realise that if I really want to get serious about it, there’s only so far a mixing bowl and wooden spoon will take me.

I’m looking to expand my repertoire beyond the odd Victoria sponge and would love to try my hand at cupcakes, macaroons and whoopie pies. And don’t get me started on bread – what better way to start the day than by eating a slice of toast from a loaf you made yourself?

So before I get cracking with a new hobby, I’ve decided I need to treat myself to a mixer. A must for any serious home baker, a mixer can really save your wrists while you’re making a batter and are so efficient at whipping and creaming that it’s almost crazy to try to do anything by hand.

You can of course buy hand-held mixers for under £20. These are quite sufficient for doing ‘light’ jobs like mixing cake batter, whipping cream and beating eggs, but won’t be able to knead bread dough. Hand-held mixers also require your active participation as you obviously need to hold them while you stand over the bowl. A stand-alone mixer, however, will mix your ingredients for you, while you get on with more important matters – like flicking through a magazine while having a cup of coffee.

Sadly, however, all this convenience doesn’t come cheap, and stand mixers are one of the most expensive small appliances you can buy for your kitchen. Artisan mixers (which are large enough to let you whip up huge amounts of batter, powerful enough to knead bread and versatile enough to let you make your own pasta) are the most expensive of all, costing upwards of £250.

This is one purchasing decision you don’t want to get wrong. So what questions should you ask yourself to ensure you don't make an expensive mistake?

Do I actually need a stand mixer? 

I’m a bit worried that my mixer will be joining the ice cream maker and sandwich toaster in the electrical appliance graveyard that is my loft. If this sounds like you, you’ll need to be sure you’ll actually use it before you buy. To help you make that decision, the Reluctant Gourmet blog advises you to ask yourself three questions:  1) Do you want to make bread? 2) Do you bake at least twice a month? 3) Do you do a lot of seasonal baking? If you answer yes to two out of three, a mixer will be a good buy for you.

Do I have enough space for it? 

Some artisan mixers can be a little on the large and bulky side – they also need to be heavy enough so that they don’t go walkabout on your kitchen counters. With this in mind, check that you have enough space for your mixer on your work top. Chances are, if you put it out of sight in a cupboard the thought of lifting it out each time you want to use it will put you off.

If you do decide to buy a stand mixer, one way to help you spread the initial cost could be by credit card, especially if you've got a card that offers a 0% period on purchases. It's important to bear in mind though that if you don’t clear the balance within the introductory period, you will be charged interest.

What features should I look for?

That very much depends on what you want to make. For bread, you’ll need a mixer that has a dough hook, a large bowl and a powerful motor – anything less than 250 watts just won’t be able to cope.

If you wanted to create other foodie treats, look for something versatile, which will have several different accessories and speed options. There are mixers out there that allow you to make your own sausages, ravioli or even ice cream.

Dishwasher-safe attachments can help you cut down on the amount of time you spend cleaning your mixer, and you’ll also want something that has metal gears. These may make a bit more noise than the nylon versions but should mean your mixer will last for years to come.

This is a Sponsored Post by Guest Blogger Tamsin McCahill on behalf of Sainsbury’s Bank.

Jubilee Cream Tea Cake

It has been nearly a month since I have done any baking for my blog. I have been pretty busy the last few weeks... I had great success raising over £250 for the charity, Restless Development, doing the Live Below the Line challenge. We then went down to Cornwall for a little holiday and had a lovely time. We had lots of sunshine and yummy food. I love it down there! Being inspired by Cornwall and the Queen's Jubilee, I found the perfect recipe to bake. A cream tea cake: giant scone base, whipped clotted cream, strawberries and blueberries! We had quite a few cream teas in Cornwall and this giant version is just like the mini treat, very YUMMY! I love this recipe and can't wait to make it again, you should definitely try this one out!

Recipe inspired by BBC GoodFood
Ingredients:
175g butter, chopped
250g self-raising flour
1 tsp baking powder
50g golden caster sugar
150ml whole milk, cold
Lemon juice, tiny squeeze
Egg, beaten for glazing
For the topping:
150g clotted cream
50g golden caster sugar
Splash of vanilla extract
200g strawberries, chopped
200g blueberries
1 tbsp strawberry jam
2.
Steps:
Preheat oven to 220C/430F. With a spatula, quickly mix the chopped butter with the flour, baking powder and 50g sugar, then add the milk and lemon juice, and mix together until you have a butter-speckled dough. Knead the dough a few times on a floured surface. Roll out to a circle, press into a lightly greased 20cm sandwich tin, then brush the top with the egg and scatter with a little extra sugar. Bake for 20 minutes until risen and golden, then transfer to a cooling rack. While the scone is cooling, toss the strawberries and blueberries in a bowl with a little sprinkling of extra sugar and the jam, then set aside. In a separate bowl, whisk the clotted cream until stiff with 50g sugar and a splash of vanilla extract. To assemble the cake, place the scone base on a serving plate, spread the cream over, leaving a slight edge of the cake showing, then pile the saucy berries on top.


Live Below the Line: Day 5, Final Day

I have made it through Day 5 of the Live Below the Line challenge!! I was in much better spirits today than yesterday, it must be because I could see the light at the end of the tunnel and my coffee headache was pretty much gone today. The day started off again by taking a banana and 2 boiled eggs into work to have as breakfast and for 2 snacks throughout the day, these 3 things cost me 28p. I love bananas but I have eaten so many eggs this week that I did not enjoy but they kept me from being hungry. It also didn't help that Krispy Kreme doughnuts were delivered in the office... everyone else was enjoying a nice doughnut and there I was with a stinky egg! They did save me some though and I will enjoy it tomorrow. I am sticking to the challenge... I made it this far I can wait 1 more day to enjoy the yummy doughnut. For lunch I made an attempt at egg drop soup and it cost me 15p to make... it didn't come out exactly like it would at a Chinese restaurant but it actually tasted pretty good. I prepared my soup last night and had a nice little surprise when I counted up how many sausages I had left and found that there was 1 extra in the pack and decided to add it in to my soup.  The soup definitely didn't look pretty and the pasta soaked up a lot of the broth but colleagues said it smelled nice. It was a lot better than the pasta veg soup that I couldn't finish earlier in the week and kept me full for the rest of the day. For dinner I saved the best for last, my version of a full English breakfast while living below the line and only cost me 53p to make, my most expensive meal of the week! I roasted my 2 small potatoes with 4 sausages in the oven and fried up 2 eggs and served with what was left of my beans. I don't think the tin of beans was really 420g but I didn't weigh out tonight's beans so I will never know. I'm glad I saved this meal for my last dinner of living below the line and it was pretty good. Total spent today for my food came in at 96p! So now that the challenge is complete it will be weird to go back above the line tomorrow and be able to have choice again, something I never really valued but I do now. I love that I have taken part in this challenge and it has given me a glimpse of what people in extreme poverty living below the line have to deal with on a daily basis.  I hope that by blogging my experience of living below the line that it has raised awareness for those 1.4 billion people living in extreme poverty conditions. Today has been my best day for sponsorships but I hope people keep giving, you can donate up to the end of June.  I want to thank every one that has sponsored me... you are helping to make a difference.

Sponsorship total today: £115!! :)

Sponsorship total so far: £233!

Please sponsor me if you can! :)

Live Below the Line: Day 4

Day 4 of living below the line is now complete and I am ready to be back ABOVE the line! I am tired of the same ingredients everyday and overall just don't feel like I have much energy... no run for me today. I started off the day again by taking a banana and 2 boiled eggs into work to have as breakfast and for 2 snacks throughout the day, these 3 things cost me 28p. For lunch I made 2 roast small potatoes mixed with baked beans and mixed vegetables with a chicken stock cube sprinkled over. It was so much better than yesterday's soup. I was able to roast my potatoes better by using the oil that came out of the sausages from last night's dinner, all about being resourceful. Lunch came in at a 26p to make and I was pretty happy with it... again! Towards the end of the day, I was really craving something sweet but I knew what was waiting for me when I got home.  For dinner I made Sausage Carbonara... well my version of it with the limited ingredients I have and it cost 45p to make. It was actually pretty tasty and I enjoyed having it. Today's grand total came in at 99p! Overall, I am feeling ok just really bored with my ingredients and ready to have choice again. I think this has been the hardest part of the challenge. I didn't receive any donations today to boost my spirits... hopefully tomorrow I will receive some sponsors.


Sponsorship total today: £0 :(

Sponsorship total so far: £118!

Please sponsor me if you can! :)

Live Below the Line: Day 3

Day 3 of living below the line is now complete! Today was just an ok day... I think living below the line is getting to me. I see all these yummy things around me and I can't have any of it... and I want it all. I can't stop thinking about food! I started off the day again by taking a banana and 2 boiled eggs into work to have as breakfast and for 2 snacks throughout the day. These 3 things cost me 28p and were ok, I think it is mainly the hard boiled eggs that are boring me. I eat a banana everyday but stinky eggs... no... and they are ok to fill me up for a little bit but not really finding them satisfying, I'm just eating them to keep food in me. So on to lunch and I made a pasta soup with mixed vegetables and beans which cost 24p to make. It was so BLAND and boring that I couldn't even finish it all. I really tried to finish it but I just couldn't, it was the low point of my day and because I didn't finish it all I was hungry by the end of the work day and couldn't wait to eat dinner. This opened my eyes to the people living below the line everyday that don't care how bland something is but eat it to keep them going another day. On Friday, I am making another version of soup and will make sure I eat it all so I don't feel hungry later on in the day. As soon as I got home today, I started preparing my dinner, Sausage Stew, which cost me 47p to make and actually tasted pretty good. It might have been because I felt really hungry but I ate dinner very quickly and all of it! Today's grand total came in at 99p! 3 days into the challenge and I feel ok, the coffee headache wasn't as bad today and the yummy dinner made up for the bland soup earlier. I am going to stay positive and try to be creative with the little amount of ingredients I have left for the week. I will just have to dream about eating cake tonight!

Sponsorship total today: £10!

Sponsorship total so far: £118!

Please sponsor me if you can! :)

Live Below the Line: Day 2

Day 2 of living below the line is now complete and I am feeling pretty good except for this headache I can not shift... coffee withdrawals! I started off the day with taking a banana and 2 boiled eggs into work to have as breakfast and for 2 snacks throughout the day. These 3 things cost me 28p and they kept me pretty satisfied today. I usually snack throughout the day but didn't really notice not being able to. I brought my lunch into to work so I could show my colleagues what kind of meals I was having and get their reactions. For lunch I made 2 roast small potatoes mixed with baked beans and mixed vegetables with a chicken stock cube sprinkled over. It was actually pretty tasty but most of the reactions I got didn't think much of my meal except for that it smelled nice. Lunch came in at a 26p to make and I was pretty happy with it. I made it though the work day just fine and even went for a run after work. Dinner was actually pretty tasty as well. It consisted of 4 sausages, mixed vegetables, pasta, and chicken stock and came to a total of 45p. The idea was to make a sausage pasta veg soup but the stock reduced down quite a bit so I'm not sure what to really call it... maybe a stew? Overall, it was pretty good food day and I was happy with what I was able to make for a grand total of 99p! It was nice to be able to talk to my colleagues about the challenge and even picked up a few more donations!

Sponsorship total today: £58!

Sponsorship total so far: £108!
 
Please sponsor me if you can! :)

Live Below the Line: Day 1

Day 1 of living below the line is now complete! I feel like I have eaten more food today then I do on a normal day. Although on a normal day, I always start it off with a cup of coffee but not today, I couldn't afford it in my £1 budget. I am definitely having coffee withdrawals and this headache won't go away, oh well all for a good cause. My breakfast this morning consisted of 2 sunny side up fried eggs seasoned with mix herbs and 2 small potatoes chopped and baked. It was actually pretty satisfying! All I would have done different was use a little oil for the potatoes and eggs and then season with some salt and pepper. Overall, it was a very nice breakfast and cost 26p to make. On to lunch, I made a pasta vegetable soup. This was my least favourite meal today. It was ok, a bit bland, but it was very filling and cost 16p to make. Dinner was my favourite meal today. It consisted of 4 sausages, 3 small potatoes, and vegetables. I seasoned the meal by crumbling a stock cube in the last 5 minutes of cooking. I had to be creative with what I bought and thought the stock cube could serve 2 purposes, make a stock or season dishes, as I couldn't afford salt and pepper. The sausages weren't as good as ones that have more meat in it but it was good enough for my budget. I just finished eating dinner and I feel so full and it only cost me 50p. I also made a hard boiled egg for a snack today but I haven't eaten it as I really didn't feel hungry for it but I have to put that towards today's budget and the egg was 8p. I used 7 out of 9 ingredients that I bought for the week. I don't think I will run out of food this week but might be bored with what I make... but that is part of this challenge to realise that some people don't have a lot of food choices and do the best they can with what they have. The hardest part I found about today was not being able to have coffee or any other flavoured drink as I could only afford the free water. Other then that I feel pretty good about today and sticking to my budget with my total coming in today at £1 spent!

Sponsorship total today: £50!

Please sponsor me if you can! :)

Live Below the Line: Shopping Day

I can't believe the Live Below the Line challenge that I signed up for in March is finally here and starting tomorrow. I did my shopping today and really wish I would have created meal plans but never got around to it and so I looked at some sample ones online and popped over to the store hoping for some good deals. To the right and below is everything I bought for the week to feed me! My grand total for Live Below the Line week is £4.93... I might see if I can find something for 7p tomorrow. I have now planned all my meals for the week and hope it works as I think it will in my head. Each day comes in at £1 or less which really was a challenge and follows the official rules! Some people have spent more then £5 for the week but overall are not spending more then a £1 day by working out the cost of each ingredient portion and are able to come up with some nice recipes. I wanted to really make this a challenge so what my budget allows for is a limited amount of ingredients and some ok recipes! I will blog my experience of living below the line every day this week.  I would love if you could sponsor me as I take on this challenge. :) It will have an affect for people living below the line everyday.


Please sponsor me as I take on this challenge this week! :)
Thank you!